Is Replacing a Headlight Hard Heres How To Do It Yourself
Replacing a headlight is easier than most people think and can be done at home with basic tools. This guide walks you through every step of headlight replacement so you can fix your vehicle quickly and safely. You will learn what tools you need, common mistakes to avoid, and expert tips to make the job a breeze.
Have you ever driven home at night and noticed one of your headlights is dead? It is a scary and frustrating experience. Dim or broken headlights make it hard to see the road. They also put you at risk during nighttime driving. Many car owners worry about fixing this problem. They assume it requires a trip to the mechanic and a big bill. But the truth is, replacing a headlight is one of the easiest car repairs you can do yourself. You do not need special skills or expensive tools. With a little guidance, you can handle this job in your own garage or driveway. This article will show you exactly how to do it.
We will cover everything from picking the right bulb to installing it correctly. You will learn about different headlight types and how they work. We will also share common mistakes that people make during this process. By the end, you will feel confident tackling this repair on your own. DIY car repair saves money and builds your mechanical skills. Let us get started and walk you through the entire process step by step.
Key Takeaways
- Replacing a headlight is a simple DIY task that most car owners can finish in under 30 minutes.
- You only need basic tools like a screwdriver, pliers, and a replacement bulb.
- Always disconnect the battery before starting any electrical work on your vehicle.
- Matching the correct bulb type is essential for proper headlight function and safety.
- Avoid touching the glass part of the bulb with bare hands to extend its lifespan.
- Testing the new headlight before reassembly saves time and prevents repeat work.
- Regular headlight maintenance improves nighttime visibility and keeps you safe on the road.
📑 Table of Contents
- Why Headlight Replacement Matters for Your Safety
- Tools and Materials You Will Need
- Step by Step Guide to Replacing a Headlight
- Common Mistakes to Avoid During Headlight Replacement
- How Long Does Headlight Replacement Take?
- When Should You Call a Professional Instead
- Tips for Extending the Life of Your New Headlight
- Headlight Replacement Cost: DIY vs Mechanic
- Final Thoughts on Replacing a Headlight
Why Headlight Replacement Matters for Your Safety
Good lighting is essential for safe driving. Your headlights help you see the road ahead during dark hours. They also make your vehicle visible to other drivers. When one headlight goes out, your visibility drops significantly. This increases the risk of accidents, especially on poorly lit roads. Many people underestimate how important it is to keep both headlights working properly. Vehicle maintenance is not just about looks. It is about safety and performance. A working headlight can make the difference between a safe trip and a dangerous one.
Understanding How Car Headlights Work
Before you start the replacement process, it helps to understand the basics. Most modern vehicles use one of three types of headlight bulbs. The most common is the halogen bulb. These have been around for decades and are affordable. The second type is the high-intensity discharge or HID bulb. These produce a bright white light and are popular in newer cars. The third type is the LED headlight. LEDs are energy efficient and last a long time. Each type has its own installation method. But the general process is similar across all of them. Knowing which type your car uses is the first step.
You can find this information in your vehicle owner’s manual. It lists the bulb type and wattage for both headlights. Some cars also have different bulbs for low beam and high beam. Take a moment to check this before you buy a replacement. Matching the correct bulb type ensures a proper fit and optimal performance. Using the wrong bulb can damage the headlight housing or the electrical system. Always double check the part number before purchasing a new bulb.
Tools and Materials You Will Need
One of the best things about replacing a headlight is how few tools you need. You do not need a garage full of equipment. Most of the items you already have at home. Here is a simple list of what you will need:
- A replacement headlight bulb that matches your vehicle
- A screwdriver set, both flathead and Phillips head
- A pair of pliers for removing clips and connectors
- Burn-resistant gloves to protect your hands
- A clean cloth or paper towel
- A flashlight or phone light to see inside the engine bay
- Your vehicle owner’s manual for reference
That is it. You do not need any specialized mechanic tools. The whole process is straightforward and beginner friendly. Having everything ready before you start makes the job go much smoother. It also prevents frustrating pauses to find a missing tool.
Choosing the Right Replacement Bulb
Not all headlight bulbs are the same. When you go to buy a replacement, you need to match the correct one. Look at your current bulb for the model number. You can also check the owner’s manual or search online using your vehicle make, model, and year. Bulb wattage matters too. Using a bulb with the wrong wattage can cause electrical problems. It can even damage the wiring harness over time. Stick with the manufacturer recommended specifications. This ensures safe and reliable operation every time you drive.
Step by Step Guide to Replacing a Headlight
Now let us get into the actual process. This is the part you have been waiting for. Follow these steps carefully and you will have your new headlight installed in no time.
Step One: Disconnect the Battery
Safety always comes first. Before you touch any electrical component, disconnect the negative terminal of your car battery. This prevents any risk of electrical shock or short circuits. Use a wrench to loosen the cable clamp on the negative terminal. Pull the cable off and tuck it away from the battery. This simple step protects you and your vehicle’s electrical system. It only takes a few seconds but it is an important safety precaution.
Step Two: Locate the Headlight Assembly
Open the hood of your car and find the back of the headlight assembly. You are looking for the plastic housing behind the headlight bulb. In most vehicles, you will see a wiring harness connected to the bulb socket. There may also be a rubber or plastic cover protecting the connection. Remove any covers or shields that are blocking access. Taking your time to identify each component makes the next steps much easier.
Step Three: Remove the Old Bulb
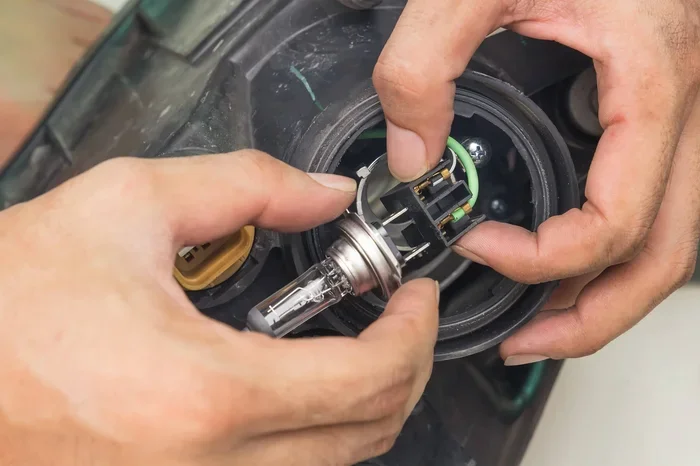
Now it is time to remove the old bulb. Start by unplugging the wiring harness from the back of the bulb. There is usually a small clip or tab holding it in place. Press or squeeze the clip and gently pull the connector away. Next, remove any retaining clips or springs that hold the bulb in the socket. Use your pliers if needed, but be gentle. Once the bulb is free, carefully pull it straight out of the socket. Dispose of the old bulb properly according to local regulations. Old bulbs can contain hazardous materials, so do not throw them in the regular trash.
Step Four: Install the New Bulb
This is the exciting part. Take your new headlight bulb out of its packaging. Here is a very important tip. Do not touch the glass part of the bulb with your bare fingers. The oils from your skin can create hot spots on the bulb when it is turned on. This shortens its lifespan significantly. Wear burn-resistant gloves or use a clean cloth to handle the bulb. Insert the new bulb into the socket. It should fit snugly and slide in easily. Do not force it. If it does not fit, double check that you have the correct bulb type. Once the bulb is in place, reconnect the wiring harness. Secure any retaining clips or springs that hold everything in position.
Step Five: Test the New Headlight
Before you reassemble everything, test the new headlight. Reconnect the battery and turn on your vehicle. Switch on the headlights and check both beams. Make sure the new bulb lights up and both headlights work evenly. If one side is dim or not working, check your connections. Testing early saves you from having to redo the entire job later. It only takes a few seconds and gives you peace of mind.
Step Six: Reassemble the Headlight Assembly
If the test goes well, it is time to put everything back together. Reinstall any covers or shields you removed earlier. Make sure the rubber seals are properly in place. These seals protect the electrical connections from moisture and debris. Secure the hood and give the headlights one final visual check. You have just completed a DIY car repair that many people pay a mechanic to do. Take a moment to feel proud of what you accomplished.
Common Mistakes to Avoid During Headlight Replacement
Even simple tasks can go wrong if you are not careful. Here are the most common mistakes people make when replacing a headlight. Avoiding these will save you time, money, and frustration.
- Touching the bulb glass with bare hands. This deposits oils that cause uneven heating and shorten bulb life. Always use gloves or a clean cloth.
- Using the wrong bulb type. A mismatched bulb can fit loosely or damage the socket. Always verify the part number before buying.
- Forcing the bulb into the socket. If it does not slide in easily, something is wrong. Check for obstructions or incorrect alignment.
- Skipping the battery disconnection. This is a safety risk. Always disconnect the battery before working on any electrical component.
- Not testing before reassembly. If you put everything back together and the bulb does not work, you have to start over again.
- Ignoring the rubber seals. Missing or damaged seals let moisture into the assembly. This can cause corrosion and electrical problems over time.
These mistakes are easy to avoid. Just take your time and follow each step carefully. Patience is your best tool when working on any car repair.
Why Headlight Alignment Is Important After Replacement
After you install a new headlight, you should also check the alignment. A misaligned headlight can blind oncoming drivers or fail to illuminate the road properly. Most headlight assemblies can be adjusted using screws on the back of the housing. Use a flat surface like a garage door to aim the lights correctly. If you are unsure, many auto parts stores offer free headlight alignment checks. Proper headlight alignment is a key part of vehicle maintenance that is often overlooked.
How Long Does Headlight Replacement Take?
One of the questions people ask most often is about time. How long does it actually take to replace a headlight? The answer depends on your vehicle and experience level. For most cars, the entire process takes between 15 and 45 minutes. If both headlights need replacing, it might take a little longer. But even two headlights should not take more than an hour for a beginner. As you gain experience, you will get faster. Some experienced car owners can do both sides in under 20 minutes.
The time also depends on how accessible the headlight assembly is. Some vehicles have easy access from the engine bay. Others require removing parts from the front of the car. Again, your owner’s manual is a great resource for understanding your specific vehicle. Knowing what to expect helps you plan your repair time and stay motivated.
Factors That Affect Replacement Difficulty
Not all headlight replacements are created equal. Several factors can make the job easier or harder. The design of your vehicle’s headlight housing plays a big role. Some cars have a simple twist-and-lock socket. Others use clips and brackets that require more effort. The age of your vehicle also matters. Older cars may have corroded connectors that need extra care to remove. The type of bulb also affects the process. LED and HID bulbs sometimes have different installation steps than traditional halogen bulbs. Understanding these factors helps you prepare for any challenges you might face.
When Should You Call a Professional Instead
There is no shame in calling a mechanic. While replacing a headlight is simple for most people, some situations call for professional help. If you have tried and the headlight still does not work, there may be a deeper electrical issue. A blown fuse, damaged wiring harness, or faulty connector could be the real problem. These issues require more advanced diagnostic skills. If your vehicle has complex headlight systems like adaptive lighting or automatic leveling, a professional may be the better choice. They have the tools and training to handle these sophisticated systems safely.
Also, if you feel uncomfortable working on your car’s electrical system, that is perfectly okay. Your safety matters more than saving a few dollars. A professional mechanic can replace a headlight quickly and correctly. Many shops charge between $50 and $100 for this simple service. It is still much cheaper than many other car repairs. Knowing your limits is part of being a responsible car owner.
Understanding Headlight Fuse and Wiring Issues
Sometimes a headlight does not work because of a fuse, not a dead bulb. If you install a new bulb and the light still does not turn on, check the fuse box. Locate the headlight fuse using your owner’s manual. Pull the fuse out and inspect it for a broken filament. A blown fuse is an easy and cheap fix. Replace it with one of the same amperage. Checking the fuse first can save you from unnecessary bulb replacements and frustration.
Wiring issues are a bit more complex. Corroded connectors or damaged wires can prevent electricity from reaching the headlight socket. If you notice frayed wires or greenish corrosion on the connectors, these need to be addressed. Clean the connectors with electrical contact cleaner or replace them if necessary. These small fixes can restore your headlight function and prevent future problems. Regular inspection of your wiring is a great habit for any car owner.
Tips for Extending the Life of Your New Headlight
You just replaced your headlight. Now you want it to last as long as possible. Here are some simple tips to help you get the most out of your new bulb.
- Always wear gloves when handling the bulb. This prevents oil transfer and extends the bulb’s life significantly.
- Keep the headlight housing clean. Dirt and debris can reduce light output and cause overheating.
- Check your headlight alignment regularly. Misaligned lights cause uneven wear and reduced visibility.
- Replace both headlights at the same time. This ensures even lighting and prevents one new bulb from looking much brighter than the old one.
- Inspect the wiring harness during replacement. Look for signs of wear or damage while you have access.
- Use quality replacement bulbs. Cheap bulbs may save money upfront but burn out faster and provide inferior light.
These small habits make a big difference over time. Proper care of your headlights improves nighttime visibility and keeps you safe on every drive. Roadside safety starts with maintaining your vehicle properly. A well maintained car is a reliable car.
Headlight Replacement Cost: DIY vs Mechanic
One of the biggest advantages of doing this yourself is the cost savings. A mechanic might charge you between $50 and $150 for a headlight replacement. That includes labor and the cost of the bulb. When you do it yourself, you only pay for the bulb. A standard halogen replacement bulb costs between $15 and $40. LED and HID bulbs cost more, typically between $50 and $150. But even the most expensive DIY bulb is cheaper than paying a mechanic. Saving money on car repairs is one of the main reasons people learn to do basic maintenance at home.
Beyond the cost savings, you also gain valuable mechanical knowledge. Each repair you do yourself builds your confidence and skills. You become more self sufficient as a car owner. This knowledge can help you handle future problems more effectively. Empowering yourself with DIY skills is one of the best investments you can make as a vehicle owner.
Final Thoughts on Replacing a Headlight
Replacing a headlight is a straightforward and rewarding task that anyone can learn. It does not require advanced mechanical knowledge or expensive tools. With the right bulb, a few basic supplies, and this guide, you can complete the job in under an hour. The process builds your confidence and saves you money. It also keeps you safe on the road by ensuring your headlights work properly. Whether you are a complete beginner or an experienced DIYer, this is a repair worth tackling yourself. Next time a headlight goes out, do not panic. Grab your tools and get to work. You will be glad you did.
Remember, car maintenance does not have to be intimidating. Start with simple tasks like headlight replacement and build from there. Each successful repair makes the next one easier. Your vehicle will thank you for the care and attention. And your wallet will thank you for avoiding unnecessary mechanic bills. Keep your headlights bright, your car running well, and your drives safe. You have got this.
Frequently Asked Questions
Can I replace a headlight bulb myself?
Yes, replacing a headlight bulb is one of the easiest DIY car repairs you can do. Most vehicles only require a screwdriver, pliers, and a replacement bulb. The entire process typically takes 15 to 45 minutes and does not require any special mechanical skills.
How do I know which headlight bulb to buy?
Check your vehicle owner’s manual for the correct bulb type and wattage. You can also look at the existing bulb for its model number. Matching the right bulb ensures a proper fit and safe operation every time.
Is it safe to touch the new headlight bulb with my fingers?
No, you should avoid touching the glass part of the bulb with bare skin. The oils from your fingers can create hot spots that cause the bulb to burn out prematurely. Always wear gloves or use a clean cloth when handling the bulb.
Should I replace both headlight bulbs at the same time?
Yes, replacing both bulbs at the same time is a great practice. It ensures even lighting on both sides and prevents one new bulb from appearing much brighter than the older one. This simple step improves visibility and safety.
What should I do if the new headlight does not work after installation?
First, check that the bulb is seated properly in the socket. Next, verify that the wiring harness is connected securely. If everything looks correct, the issue may be a blown fuse or a faulty connector. Checking the fuse box is a quick and easy first step.
How much money can I save by replacing a headlight myself?
Doing it yourself can save you between $50 and $100 in labor costs. You only need to pay for the replacement bulb, which typically costs between $15 and $150 depending on the bulb type. It is one of the most cost effective car repairs you can perform at home.
=== CONCLUSION ===
Replacing a headlight is far easier than most people believe. It is a simple, affordable repair that anyone can do with basic tools and a little patience. From choosing the right bulb to testing the final result, every step is manageable for a beginner. This guide has given you everything you need to know to tackle the job confidently. You now understand the process, the common mistakes, and the tips that make the job smoother. Put this knowledge to use the next time a headlight burns out. You will save money, build your skills, and keep your vehicle safe for every drive. Take action today and experience how simple car maintenance can be when you do it yourself.