Is Changing Brake Fluid a Big Job Here Is the Answer
Is Changing Brake Fluid a Big Job? The short answer is no, but it does require basic tools and a little patience. This guide walks you through the brake fluid change process, costs, and when to DIY versus call a professional. You’ll learn how to flush brake fluid safely and keep your car’s hydraulic system in top shape.
Have you ever wondered if changing your brake fluid is a big job? Many car owners put it off because they fear it’s complicated or messy. The truth is, it’s a manageable task that most DIYers can handle with basic tools. So, is changing brake fluid a big job? Not really.
Brake fluid is the lifeblood of your car’s stopping power. It transfers the force from your foot on the pedal to the brakes at each wheel. Over time, this hydraulic fluid absorbs moisture from the air, which can lower its boiling point and cause corrosion inside the brake lines. A brake fluid change replaces the old, contaminated fluid with fresh, clean fluid. This simple maintenance step can prevent expensive repairs and keep you safe on the road.
In this guide, I’ll walk you through everything you need to know. I’ll explain what brake fluid does, why it needs changing, and whether you should do it yourself or visit a shop. You’ll also get a step-by-step brake fluid flush guide, cost breakdowns, and common mistakes to avoid. By the end, you’ll know exactly how to tackle this job with confidence.
Key Takeaways
- Changing brake fluid is a manageable DIY job if you have a clear guide and the right tools.
- Brake fluid absorbs moisture over time, which lowers its boiling point and can compromise safety.
- A brake fluid flush costs $70 to $150 at a shop, but DIY parts cost under $30.
- Using the wrong DOT fluid can damage seals and lead to brake failure.
- Bleeding the brakes properly is the most critical step to remove air from the lines.
- Change your brake fluid every 2 years or as your vehicle manufacturer recommends.
- Call a mechanic if you feel unsure about the process or notice a spongy brake pedal.
📑 Table of Contents
- What Is Brake Fluid and Why Does It Matter?
- Is Changing Brake Fluid a Big Job?
- Step-by-Step Brake Fluid Change Guide
- Brake Fluid Change Cost: DIY vs. Professional
- Common Mistakes to Avoid When Changing Brake Fluid
- How Often Should You Change Your Brake Fluid?
- Final Verdict: Is It Worth Doing Yourself?
What Is Brake Fluid and Why Does It Matter?
Brake fluid is a special hydraulic liquid that operates under high pressure and temperature. It sits in the brake reservoir on top of the master cylinder. When you press the brake pedal, the fluid pushes through steel brake lines to each caliper or wheel cylinder. The fluid then applies pressure to the brake pads or shoes, creating the friction that stops your car.
Unlike engine oil or coolant, brake fluid must stay liquid under all conditions. It cannot boil or freeze easily. The Department of Transportation (DOT) classifies brake fluids into different grades, such as DOT 3, DOT 4, and DOT 5.1. Each type has a specific boiling point and chemical composition. Most modern cars use DOT 3 or DOT 4, which are glycol-based. Never mix different types unless your owner’s manual says it’s okay.
Moisture is the biggest enemy of brake fluid. Even in a sealed system, small amounts of water can enter through microscopic pores in rubber hoses or when you open the reservoir. This moisture lowers the fluid’s boiling point, a property called the wet boiling point. When the fluid gets too hot, it can vaporize, creating air bubbles. Air in the brake lines causes a spongy pedal or even brake failure. This is why a regular brake fluid flush is so important.
The Role of Brake Fluid in Your Car
Think of brake fluid as the messenger between your foot and the brakes. It multiplies the force you apply to the pedal and delivers it evenly to all four wheels. Without clean fluid, that message gets distorted. You might notice a soft or sinking pedal, longer stopping distances, or a warning light on the dash. The brake system relies on incompressible fluid to work. Air is compressible, so even a small amount can make your brakes feel weak and unsafe.
How Moisture Gets Into the System
Moisture enters the brake system in several ways. The most common path is through the rubber brake hoses. These hoses flex with the suspension and steering, and they have tiny pores that allow water vapor to seep through. Every time you open the reservoir cap to check the fluid, humid air enters and condenses. Driving in humid or coastal climates speeds up this process. Even the act of pumping the brake pedal can draw in tiny amounts of moisture over time.
Is Changing Brake Fluid a Big Job?
Many people hesitate because they picture a complex hydraulic system full of scary parts. But changing brake fluid is actually one of the simpler maintenance tasks you can do at home. It’s not as daunting as changing the transmission or rebuilding an engine. The job mainly involves draining the old fluid, refilling the reservoir, and bleeding air out of the lines at each wheel.
So, is changing brake fluid a big job? The answer depends on your comfort level with basic car maintenance. If you can change a tire or check your oil, you can handle a brake fluid flush. It requires a basic set of wrenches, a turkey baster or fluid extractor, a clear hose, a container for old fluid, and a helper to pump the pedal. The entire process takes about 30 to 60 minutes for most vehicles. The hardest part is bleeding the brakes to remove all the air, but a little patience goes a long way.
DIY Brake Fluid Change vs. Professional Service
Doing it yourself saves money and teaches you valuable skills about your car. A professional brake fluid change at a shop or dealership typically costs between $70 and $150, depending on your location and vehicle type. The parts themselves are cheap. A quart of quality DOT 4 fluid costs around $10 to $20. A brake fluid test strip can tell you if your fluid is still good or needs replacing. If you’re handy and have a clean workspace, the DIY route makes a lot of sense.
On the other hand, some people prefer the peace of mind that comes with a professional service. A mechanic has a pressure bleeder and vacuum pump that can make the job faster and more thorough. They also inspect the brake lines, calipers, and master cylinder for leaks while they’re at it. If you’ve never done brake work before, it might be worth paying for the first change so you can see how it’s done. After that, you’ll feel confident to do it yourself.
Tools and Materials You’ll Need
Gather everything before you start. You don’t want to stop halfway through because you’re missing a wrench. Here’s a simple checklist:
- New brake fluid – Check your owner’s manual for the correct DOT type. Most cars use DOT 4.
- Turkey baster or fluid extractor – To suck out the old fluid from the reservoir.
- Clear plastic tubing – About 3 feet of 5/16-inch tubing fits most bleed nipples.
- Container for waste fluid – A metal pan or a dedicated brake fluid catch bottle.
- Set of wrenches – Open-end or box-end wrenches to fit the bleed valves at each wheel.
- Brake cleaner spray – To clean the reservoir area and wipe up any spills.
- Rags or paper towels – Brake fluid damages paint, so keep plenty of rags handy.
- A helper – Someone to pump the brake pedal while you open and close bleed valves.
Step-by-Step Brake Fluid Change Guide
Follow these steps in order for a clean, safe brake fluid flush. Work on a cool engine and never reuse old brake fluid. Brake fluid is hygroscopic, meaning it absorbs moisture, so it’s contaminated the moment you open the bottle.
Preparing the Vehicle
Park your car on a flat, level surface and engage the parking brake. Loosen the lug nuts on all four wheels if you plan to lift the car, but you don’t necessarily need to jack it up. Most brake fluid changes can be done with the car on the ground. Clean the top of the brake reservoir with brake cleaner to remove any dirt. Use a turkey baster to suck out all the old fluid from the reservoir. Wipe the inside with a lint-free rag. This prevents dirty fluid from spilling into the system when you open the bleed valves.
Bleeding the Brakes
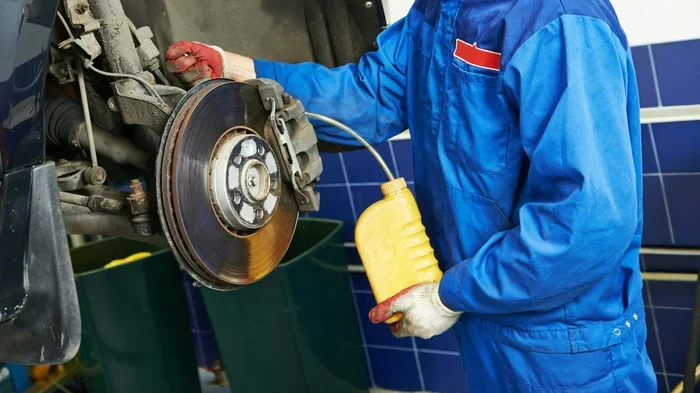
Start with the wheel farthest from the master cylinder, which is usually the right rear wheel. Have your helper sit in the driver’s seat. Tell them to press the brake pedal slowly and hold it down. While they hold pressure, use a wrench to open the bleed valve on the caliper or wheel cylinder. A small amount of fluid and air will bubble out into the clear tube. Close the valve before your helper releases the pedal. Repeat this process several times until the fluid runs clear with no bubbles. Then move to the left rear, right front, and left front wheels. Always keep the reservoir topped off with fresh fluid during this process. Never let the reservoir run dry, or you’ll pull air back into the lines.
Disposing of Old Fluid Properly
Brake fluid is a hazardous material. Do not pour it down the drain or onto the ground. Seal the container of old fluid and take it to a local auto parts store, recycling center, or mechanic who accepts hazardous waste. Brake fluid can harm the environment and contaminate water sources. A quick search for brake fluid disposal near me will show you the nearest drop-off location.
Brake Fluid Change Cost: DIY vs. Professional
Understanding the cost helps you decide whether to DIY or visit a shop. The price of brake fluid itself is very low. A quart of quality DOT 4 brake fluid costs around $10 to $15, and most cars need less than a quart for a full change. If you do it yourself, your total cost is just the price of the fluid and any tools you don’t already own. A simple brake fluid test strip kit costs about $5 and gives you a clear visual indication of the fluid’s condition.
At a professional shop, the labor rate is the main expense. Mechanics charge between $80 and $150 per hour. A brake fluid flush typically takes one hour, so you’re paying for the time and the fresh fluid. Some shops offer a brake fluid change as part of a multi-point inspection or seasonal service package, which can save you money. If you have a luxury car or a vehicle with a complex brake system, the cost might be higher because of the amount of fluid required or the difficulty of accessing bleed valves.
DIY Cost Breakdown
- Brake fluid – $10 to $20
- Clear tubing and catch bottle – $5 to $10 (reusable)
- Brake cleaner spray – $5 to $8
- Wrenches or flare nut wrenches – $15 to $30 (if you don’t have them)
- Total DIY cost – Under $50 for most vehicles
Shop vs. Home Savings
A professional brake fluid flush costs $70 to $150 on average. Doing it yourself saves you $50 to $130. Beyond the money, you gain the satisfaction of maintaining your own car and the knowledge that the job was done correctly. I always recommend keeping a small bottle of brake fluid and a turkey baster in your garage. You’ll be ready for the next brake maintenance schedule interval without making a special trip to the parts store.
Common Mistakes to Avoid When Changing Brake Fluid
Even a simple job can go wrong if you skip steps or use the wrong materials. I’ve seen many people make avoidable mistakes that lead to spongy brakes or contaminated systems. Here are the most common pitfalls and how to steer clear of them.
Using the Wrong DOT Fluid
This is the number one mistake. Never mix DOT 3 with DOT 4, and never use DOT 5 (silicone-based) in a system designed for glycol fluid. The chemical properties are different, and mixing them can cause seals to swell, leak, or fail. Always check your owner’s manual or the label on the master cylinder reservoir cap. If your car calls for DOT 4, don’t substitute DOT 3 just because it’s cheaper. Using the wrong fluid can lead to brake fade, corrosion, and eventual brake failure. This is a safety-critical decision, so take it seriously.
Skipping the Bleeding Process
Some DIYers drain the reservoir and refill it without bleeding the lines. This leaves air trapped in the brake lines and calipers. Air compresses under pressure, which creates a spongy or sinking brake pedal. The pedal might feel fine at first, but under hard braking, the air compresses and your stopping power drops dramatically. Always bleed the brakes in the correct order, starting from the farthest wheel. If you notice a mushy pedal after refilling, pump the pedal a few times and bleed the affected wheel again.
Letting the Reservoir Run Dry
When you bleed the brakes, you remove fluid from the system through the bleed valves. If you don’t keep the reservoir topped off, air gets sucked into the master cylinder. Once air enters the master cylinder, you have to bleed it too, which adds time and frustration. Keep a bottle of fresh fluid nearby and refill the reservoir after every few pumps of the pedal. Use a clear reservoir or a piece of tape to mark the fluid level so you can monitor it easily.
Not Cleaning the Area Around the Reservoir
Dirt and grime around the brake reservoir can fall into the open reservoir when you remove the cap. Brake fluid is corrosive to paint and can damage rubber seals if contaminated with debris. Always clean the reservoir cap and surrounding area with brake cleaner and a lint-free rag before opening it. This small step prevents costly repairs and keeps your brake system working reliably.
How Often Should You Change Your Brake Fluid?
Most vehicle manufacturers recommend changing brake fluid every 2 years or 30,000 miles, whichever comes first. Some brands say every 3 years. The interval depends on the fluid type, driving conditions, and climate. If you live in a humid area or do a lot of stop-and-go city driving, moisture absorption happens faster. Check your owner’s manual for the specific recommendation. You can also use a brake fluid test strip to measure the fluid’s moisture content. If the strip shows the fluid is below the acceptable range, it’s time for a change regardless of the mileage.
Manufacturer Recommendations
Car companies build brake fluid change intervals into the maintenance schedule. For example, many Toyota and Honda models call for a fluid change every 2 years. European cars like BMW and Mercedes often recommend the same. These guidelines are based on testing the fluid’s boiling point over time. A brake fluid change interval of 2 years is a safe, conservative estimate for most drivers. If you can’t find your manual, a quick search for your car’s year, make, and model plus brake fluid change interval will give you the answer.
Signs Your Brake Fluid Needs Changing
Your car will give you warning signs before the fluid becomes a serious problem. Watch for these indicators:
- Dark or brown fluid – Fresh brake fluid is clear or light yellow. Dark fluid means it has absorbed moisture and oxidized.
- Spongy or soft brake pedal – Air in the lines or contaminated fluid causes the pedal to feel mushy.
- Longer stopping distances – If your brakes feel less responsive, the fluid may be boiling under heat.
- ABS light on the dash – Moisture in the brake system can trigger the anti-lock brake sensor.
- Rusty or corroded brake lines – Moisture in the fluid eats away at metal components from the inside.
Final Verdict: Is It Worth Doing Yourself?
So, is changing brake fluid a big job? I hope this guide has shown you it’s a straightforward task that anyone can learn. Changing brake fluid is a big job only if you let it be. With the right tools, a little patience, and a helper, you can complete a full brake fluid flush in under an hour. You’ll save money, gain confidence, and keep your car’s stopping power at its best.
The biggest benefit is safety. Fresh brake fluid with a high boiling point ensures your brakes work even under hard braking or on steep downhill runs. Contaminated fluid can lead to brake fade, which is terrifying and dangerous. By changing your fluid on schedule, you’re protecting yourself, your passengers, and everyone else on the road.
Quick Tips for Success
- Work on a cool engine – Brake fluid gets hot and can burn you.
- Never reuse old fluid – Always dispose of it properly.
- Keep the reservoir full – Prevent air from entering the master cylinder.
- Use a helper – Pumping and holding the pedal is much easier with a second person.
- Clean up spills immediately – Brake fluid eats paint and finishes.
When to Call a Mechanic
If you feel unsure about any part of the process, call a professional. A professional brake service is always a good choice if you notice a brake fluid leak, a grinding noise, or a brake pedal that goes to the floor. These signs indicate a more serious problem that a simple fluid change won’t fix. A mechanic can inspect the entire brake system, including the master cylinder, calipers, and brake lines, and make any needed repairs. There’s no shame in asking for help when it comes to your safety.
Changing your brake fluid is one of the most overlooked yet important maintenance tasks. It’s cheap, quick, and easy to do once you know the steps. Next time you’re under the hood, grab a bottle of fresh fluid and give it a try. Your brakes will thank you with firm, reliable stops every time you press the pedal.
Frequently Asked Questions
Is Changing Brake Fluid a Big Job for Beginners?
Not at all. It’s one of the simplest maintenance tasks you can do. If you can change a tire or check your oil, you can handle a brake fluid flush. The key is to follow the steps carefully, especially the bleeding process, and to use the correct type of fluid.
How Long Does It Take to Change Brake Fluid?
Most people finish the job in 30 to 60 minutes. The time depends on how easily the bleed valves release and whether you have a helper. If you’re doing it for the first time, set aside an extra 30 minutes to learn the process without rushing.
Can I Use Any Brake Fluid for My Car?
No. Always use the DOT type specified in your owner’s manual. Using the wrong fluid can damage seals, cause leaks, and reduce braking performance. DOT 3 and DOT 4 are not interchangeable in all systems, and DOT 5 silicone fluid should never be used in a system designed for glycol fluid.
What Happens If I Don’t Change My Brake Fluid?
Old brake fluid absorbs moisture, which lowers its boiling point. Under heavy braking, the fluid can boil and create air bubbles, leading to a spongy pedal or complete brake failure. Moisture also causes internal corrosion in the brake lines, calipers, and master cylinder, leading to expensive repairs down the road.
Do I Need to Bleed All Four Wheels?
Yes. Bleeding all four wheels ensures that all air is removed from the brake lines. The standard order is right rear, left rear, right front, and left front. This sequence starts with the wheel farthest from the master cylinder and works your way closer.
Is a Brake Fluid Change the Same as a Brake Fluid Flush?
They are often used interchangeably, but a flush typically involves using a pressure or vacuum tool to push new fluid through the entire system while pushing out old fluid. A basic change involves draining the reservoir, refilling, and bleeding each wheel. Both methods achieve a fresh fluid system, but a flush is more thorough and is what most professionals do.