Car Stereo Amplifier Board Upgrade Guide for Beginners
A car stereo amplifier board is the heart of your vehicle’s audio system, and upgrading it can transform your daily drives. This guide covers everything beginners need to know, from understanding how amplifier boards work to choosing the right one and installing it yourself. You will learn about different amplifier types, key features to look for, and step-by-step installation tips that make the process simple and stress-free.
Your car’s audio system can only sound as good as the components driving it. If you have ever listened to music through your factory speakers and thought, “This sounds flat and weak,” the problem might be your amplifier board. A car stereo amplifier board is a small but powerful circuit that takes the low-voltage audio signal from your head unit and boosts it so your speakers can produce rich, full sound.
Upgrading your car stereo amplifier board is one of the most impactful changes you can make to your vehicle’s audio setup. Whether you drive a sedan, truck, or SUV, the right amplifier board can bring your music to life. Deep bass, clear vocals, and crisp highs become noticeable the moment you turn the volume up. And the best part? You do not need to be an electronics expert to do it.
This guide walks you through everything you need to know as a beginner. We will cover what amplifier boards do, why upgrading matters, the different types available, how to pick the right one, and how to install it yourself. By the end, you will feel confident about making your car audio upgrade and enjoying a better listening experience every time you hit the road.
Key Takeaways
- A car stereo amplifier board boosts audio power: It takes the weak signal from your head unit and amplifies it for louder, clearer sound.
- Upgrading improves overall sound quality: You get deeper bass, cleaner mids, and smoother highs across your speakers.
- Match the amplifier board to your needs: Consider power output, channel count, amplifier class, and budget before buying.
- Installation is doable at home: With basic tools and patience, most beginners can complete the upgrade in under two hours.
- Avoid common wiring mistakes: Proper grounding, correct gauge wiring, and careful gain tuning prevent damage and noise.
- Maintenance keeps your board running strong: Regular checks on connections and heat management extend the life of your amplifier.
📑 Table of Contents
- What Is a Car Stereo Amplifier Board?
- Why Upgrade Your Car Stereo Amplifier Board?
- Types of Car Stereo Amplifier Boards
- How to Choose the Right Amplifier Board
- Step-by-Step Installation Guide
- Common Mistakes to Avoid
- Maintaining Your Amplifier Board for Longevity
- Expert Insights on Car Audio Upgrades
- Conclusion
What Is a Car Stereo Amplifier Board?
A car stereo amplifier board is an electronic circuit board designed to increase the power of an audio signal. Your car’s head unit, also called the infotainment system, produces a very weak electrical signal. That signal alone cannot drive speakers effectively. The amplifier board takes that weak signal and multiplies its power so your speakers can move air and create sound you can actually hear and feel.
How Does an Amplifier Board Work?
The process is simpler than it sounds. Your head unit sends a line-level audio signal to the amplifier board. The board uses transistors or integrated circuits to increase the voltage and current of that signal. The boosted signal then travels to your speakers, causing the speaker cones to vibrate and produce sound waves. This entire process happens in milliseconds.
Inside the board, you will find several key components. The preamp stage handles the initial signal and applies adjustments like bass boost and equalization. The power amp stage does the heavy lifting of increasing volume and clarity. A power supply section draws electricity from your car’s battery to fuel the amplification process. Together, these stages work to deliver clean, powerful audio to your speakers.
Built-In vs. External Amplifier Boards
Many factory car radios come with a built-in amplifier integrated directly into the head unit. These are compact and convenient, but they have limits. Built-in amplifiers usually produce between 10 and 30 watts per channel, which is enough for basic listening but not enough for audiophile-quality sound.
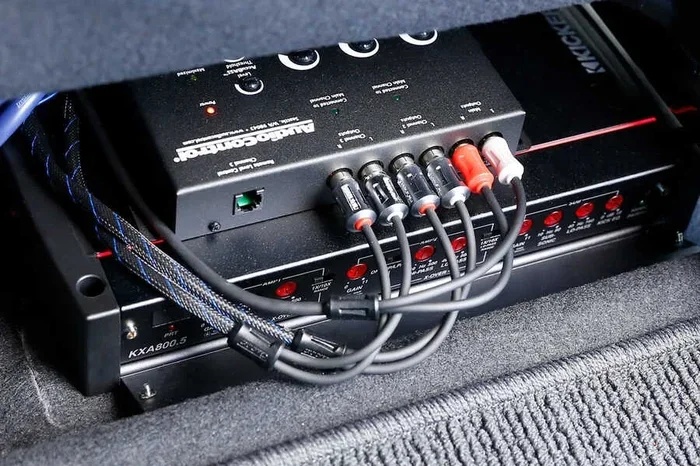
An external amplifier board is a separate unit that you add to your system. These boards offer significantly more power, often ranging from 50 watts to over 1,000 watts per channel. They also tend to produce cleaner sound with less distortion. When people talk about a car audio upgrade, adding an external amplifier board is usually the first thing they recommend.
Why Upgrade Your Car Stereo Amplifier Board?
If your current system sounds okay, you might wonder why you need an upgrade. The truth is, there are several clear reasons a car stereo amplifier board upgrade can make a real difference in your daily driving experience.
Better Sound Quality
The number one reason to upgrade is better sound. A dedicated amplifier board provides more clean power to your speakers. This means less distortion at higher volumes and a wider dynamic range. You will notice details in songs you never heard before. Background instruments become clearer. Vocals sound richer and more present.
Factory head units often clip or distort when you turn the volume past halfway. A better amplifier circuit board eliminates this problem. Your music stays clean and crisp even at high volumes, which is especially important on highway drives with road noise.
Stronger Bass and Fuller Sound
Factory speakers in most cars are not designed to handle deep bass. A weak amplifier signal simply cannot push low-frequency notes hard enough. Upgrading your car audio amplifier gives you the power needed to reproduce bass accurately. Subwoofers and mid-bass drivers respond much better when they receive a strong, clean signal from a quality amplifier board.
More Control Over Your Audio
Modern amplifier boards come with adjustable features. You can fine-tune gain settings to match your speakers. Many boards include bass boost controls, crossover filters, and equalizer options. This level of control lets you customize your sound to match your personal taste and your car’s acoustic environment.
Protect Your Existing Speakers
Here is something many car owners do not realize. A poor-quality or underpowered amplifier can actually damage your speakers. When an amplifier clips, it sends distorted, harsh signals that can burn out speaker cones over time. A good car stereo amplifier board delivers clean power, which protects your speakers and helps them last longer.
Types of Car Stereo Amplifier Boards
Not all amplifier boards are the same. Understanding the different types helps you choose the right one for your needs. Each type serves a different purpose and fits different budgets and setups.
Mono Amplifier Boards
A mono amplifier board has a single channel. It is designed to power one speaker, usually a subwoofer. Mono boards are the go-to choice for bass lovers. They focus all their energy on producing deep, punchy low frequencies. If your main goal is to add thumping bass to your car, a mono board is the way to go.
4-Channel Amplifier Boards
A 4-channel amplifier board powers four speakers simultaneously, typically the front left, front right, rear left, and rear right. This is the most versatile option for a full-car audio upgrade. You can run all four speakers full-range, or bridge two channels to power a subwoofer while keeping the other two channels for your front speakers.
Class D Amplifier Boards
Class D amplifier boards use switching technology to amplify audio signals. They are highly efficient, meaning they waste less energy as heat. This makes them smaller and cooler-running than other types. Class D boards are very popular for car installations because they fit in tight spaces and draw less power from your electrical system.
Class AB Amplifier Boards
Class AB amplifier boards use a combination of Class A and Class D designs. They offer excellent sound quality with moderate efficiency. Audiophiles often prefer Class AB boards because they tend to produce a warmer, more natural sound. However, they are slightly larger and generate more heat than Class D boards.
Compact Amplifier Boards
Compact amplifier boards are small, plug-and-play units designed for simple upgrades. They often mount behind the dashboard or under a seat. These boards are perfect for beginners who want better sound without a complicated installation. They typically offer 2 to 50 watts per channel, which is enough to noticeably improve factory audio systems.
How to Choose the Right Amplifier Board
Choosing the right car stereo amplifier board can feel overwhelming with so many options available. But if you focus on a few key factors, the decision becomes much simpler.
Match Power Output to Your Speakers
Power output is measured in watts. You want your amplifier to match the power handling capacity of your speakers. If your speakers are rated for 50 watts RMS, look for an amplifier board that delivers close to 50 watts RMS per channel. Mismatching power can lead to poor sound or damaged speakers.
RMS power is the key number to look at. It represents the continuous, clean power an amplifier can deliver. Peak power is a marketing number and does not reflect real-world performance. Always compare RMS ratings when shopping for a car audio amplifier.
Consider the Number of Channels
Think about how many speakers you want to power. A two-channel board works for a basic front-speaker upgrade. A four-channel board covers all speakers. A mono board is ideal for subwoofer setups. You can also bridge channels on a multi-channel board to get more power for a single speaker or subwoofer.
Check Amplifier Class and Efficiency
The amplifier class affects sound quality, efficiency, and heat output. Class D boards are the most efficient and compact. Class AB boards offer slightly better sound quality but run warmer. For most car installations, Class D provides the best balance of performance and practicality.
Look for Useful Features
Modern amplifier circuit boards come with features that enhance your listening experience. Look for adjustable gain controls, built-in crossovers, bass boost switches, and remote turn-on capabilities. Some boards even include Bluetooth connectivity or USB inputs for direct music playback. These extras add convenience and flexibility to your car audio system.
Set a Realistic Budget
Amplifier boards range from under $30 to over $300. Budget boards from brands like Boss, Pyle, and Rockford Fosgate offer solid performance for casual listeners. Mid-range boards from brands like JL Audio, Pioneer, and Kicker deliver excellent sound quality. High-end boards are for serious audiophiles who demand the absolute best stereo sound system in their vehicle.
Step-by-Step Installation Guide
Installing a car stereo amplifier board is easier than most people think. With basic tools and a little patience, you can complete the job in one to two hours. Here is a clear, beginner-friendly walkthrough.
Step 1: Gather Your Tools and Materials
Before you start, make sure you have everything you need. You will need the amplifier board, amplifier wiring kit (which includes power cable, ground wire, and remote turn-on wire), speaker wire, ring terminals, a wire crimping tool, a socket set, a multimeter, and electrical tape. Having everything ready before you start keeps the process smooth and frustration-free.
Step 2: Disconnect the Battery
Safety first. Always disconnect the negative terminal of your car battery before working on any electrical component. Use a wrench to loosen the cable and pull it away from the battery post. This prevents short circuits and protects your vehicle’s electrical system.
Step 3: Run the Power Cable
Feed the power cable from the battery through the firewall into the cabin. Use an existing grommet or drill a clean hole if needed. Connect the power cable to the positive battery terminal using an inline fuse holder. The fuse should be placed within 18 inches of the battery for safety. Run the cable along the firewall and behind the trim panels to your amplifier mounting location.
Step 4: Ground the Amplifier Board
Find a clean, bare metal spot on the car chassis within 18 inches of the amplifier. Sand the paint off the metal surface to ensure a solid connection. Attach the ground wire using a ring terminal and bolt. A good ground is essential for clean audio and preventing electrical noise in your stereo sound system.
Step 5: Connect the Remote Turn-On Wire
The remote turn-on wire tells your amplifier to power on when you turn on your head unit. Connect this wire to the remote lead from your factory radio or to the accessory wire on your new head unit. This small wire makes a big difference in convenience.
Step 6: Wire the Speakers
Run speaker wire from the amplifier board output to each speaker. Match the positive and negative terminals on the amplifier with the corresponding terminals on each speaker. Use proper gauge speaker wire, typically 16-gauge for short runs and 14-gauge for longer runs. Secure connections with crimped ring terminals.
Step 7: Connect the Audio Signal
Connect the RCA cables from your head unit output to the amplifier board input. If your head unit does not have RCA outputs, you may need a line output converter. This small device takes the speaker-level signal from your factory radio and converts it to a line-level signal your amplifier board can use.
Step 8: Reconnect the Battery and Test
Reconnect the battery negative terminal. Turn on your head unit and set the volume to about 75%. Play music and listen for any buzzing or humming. If you hear noise, check your ground connection and make sure all wires are secure. Adjust the amplifier gain settings on the board to match your head unit’s output level.
Quick Tips for a Smooth Installation
- Always use the correct wire gauge for your power and speaker connections.
- Keep power cables and speaker wires apart to avoid interference.
- Use zip ties to bundle and secure wires neatly behind panels.
- Double-check all connections before reconnecting the battery.
- Take photos during the process to help with reassembly.
Common Mistakes to Avoid
Even with a simple installation, beginners can make mistakes that cause problems. Knowing what to avoid saves time, money, and frustration.
Skipping the fuse. Never run a power cable without an inline fuse. A short circuit can damage your amplifier board, your car’s wiring, or even cause a fire. Always fuse your power connection as close to the battery as possible.
Poor grounding. A bad ground connection is the number one cause of buzzing and humming in car audio systems. Always sand down the contact point to bare metal and use a solid bolt connection. Do not ground to the battery negative terminal; always ground to the chassis.
Mismatching power. Connecting an amplifier board that is too powerful for your speakers can blow them out. Connecting one that is too weak means you will not get the best performance. Always match RMS ratings between your amplifier and speakers.
Ignoring heat management. Amplifier boards generate heat during operation. Do not mount them in enclosed spaces without ventilation. Keep them away from hot surfaces like exhaust pipes. Good airflow keeps your car stereo amplifier board running cool and reliable.
Over-tightening connections. RCA jacks, speaker terminals, and terminal connections can crack if you force them too tight. Hand-tighten all connections and use thread-lock compound if needed. Gentle pressure goes a long way.
Maintaining Your Amplifier Board for Longevity
Once your car stereo amplifier board is installed and sounding great, a little maintenance goes a long way. Regular care keeps your amplifier performing at its best for years.
Check your connections every few months. Vibration from driving can loosen wire terminals over time. Inspect the power and ground connections for any signs of corrosion. Clean any corrosion with a wire brush and reapply the connection.
Keep the amplifier board and its surroundings clean. Dust and debris can block ventilation and cause overheating. Use compressed air to blow out any dust that collects around the board. If your amplifier has a fan, make sure it spins freely.
Monitor your amplifier’s performance over time. If you notice a drop in sound quality, distortion at lower volumes, or the board cutting out, these could be signs of a failing component. Address issues early before they cause permanent damage. A well-maintained car audio amplifier can last for many years of reliable service.
Expert Insights on Car Audio Upgrades
Professional car audio installers agree that upgrading the amplifier board is the single best investment for improving in-car sound. According to industry experts, a quality amplifier board can make even budget speakers sound dramatically better. The amplifier does more than just make things louder. It provides the clean, stable power that allows speakers to reproduce audio accurately across the full frequency range.
Experts also recommend taking the time to tune your system properly after installation. Spending 15 minutes adjusting gain levels, crossover settings, and equalizer presets can make a bigger difference than spending hundreds more on premium speakers. A well-tuned stereo sound system with a basic amplifier board will outperform a premium speaker setup with a poorly configured amplifier every time.
One more tip from the pros: do not overlook the importance of your head unit. Even the best car stereo amplifier board will not perform well if the source signal is poor. If your head unit is old or damaged, consider upgrading it alongside the amplifier for the best overall results. A modern head unit with clean outputs and digital signal processing capabilities pairs beautifully with a quality amplifier board.
Conclusion
Upgrading your car stereo amplifier board is one of the most rewarding upgrades you can make to your vehicle. It improves sound quality, adds power, protects your speakers, and gives you full control over your audio experience. Whether you choose a compact board for a simple boost or a multi-channel board for a complete system overhaul, the difference in sound quality is immediate and noticeable.
The process is more accessible than most beginners expect. With the right board, proper wiring, and a little patience, you can transform your car’s audio from forgettable to fantastic. Start by understanding your current system, choose an amplifier board that matches your speakers and goals, follow the installation steps carefully, and take the time to tune your settings.
Your ears will thank you every time you get behind the wheel. A great car audio upgrade turns every commute, road trip, and errand into a better experience. So go ahead, pick the right car stereo amplifier board, and enjoy the music your car was always meant to deliver.
Frequently Asked Questions
What is the best car stereo amplifier board for beginners?
For beginners, compact Class D amplifier boards from brands like Boss, Rockford Fosgate, or Pioneer are excellent choices. They are easy to install, affordable, and deliver clean power without complicated setup. Look for a board with adjustable gain controls and a power output that matches your speaker ratings for the best results.
How much power do I need from my amplifier board?
Match the amplifier’s RMS power output to your speakers’ RMS power handling rating. If your speakers handle 50 watts RMS per channel, choose an amplifier board that delivers around 50 watts RMS per channel. This ensures clean, distortion-free sound without risking damage to your speakers.
Can I install a car stereo amplifier board myself?
Yes, most beginners can install an amplifier board at home with basic tools. The process involves running power and ground wires, connecting speaker wires, and linking the audio signal from your head unit. Follow a step-by-step guide, take your time, and always disconnect the battery before starting any electrical work.
What is the difference between RMS power and peak power?
RMS power stands for root mean square and represents the continuous, clean power an amplifier can deliver over time. Peak power is the maximum short burst of power the amplifier can handle. Always use RMS power when comparing amplifier boards because it reflects real-world performance, while peak power is a temporary maximum that is not useful for daily listening.
Why does my amplifier board buzz or hum after installation?
A buzzing or humming sound is usually caused by a poor ground connection or interference from nearby wires. Check that your ground wire is connected to clean, bare metal on the chassis. Keep power cables away from RCA and speaker wires to prevent electrical interference. A solid ground connection is the most common fix for noise issues in car audio systems.
How do I know if my amplifier board is overheating?
Signs of overheating include the amplifier cutting out during loud passages, a burning smell, or the board feeling excessively hot to the touch. Ensure the amplifier has proper ventilation and is not mounted in an enclosed space. Check that the fan is working if your board has one, and avoid placing the board near heat sources like exhaust pipes.
=== META TITLE ===
Car Stereo Amplifier Board Upgrade Guide for Beginners
=== URL SLUG ===
car-stereo-amplifier-board-upgrade-guide
=== META DESCRIPTION (Final) ===
Learn how to upgrade your car stereo amplifier board with our beginner-friendly guide. Boost sound quality, pick the right board, and install it like a pro.