How Do You Tighten a Loose Heat Shield on Your Car
A loose heat shield can cause annoying rattling sounds and potentially damage your car’s exhaust system if left unchecked. Learning how to tighten a loose heat shield is a simple DIY task that saves you money and keeps your vehicle running safely. This guide walks you through every step, from identifying the problem to completing the repair with confidence.
You are driving down the road, and suddenly you hear a loud rattling sound coming from underneath your car. It gets louder when you accelerate and quieter when you slow down. What could it be? More often than not, the culprit is a loose heat shield. This thin metal piece plays a big role in keeping your car safe from extreme heat. When it starts to rattle, it is telling you something needs attention. The good news is that fixing it is easier than most people think.
Whether you are a seasoned DIY mechanic or someone who has never popped a hood, this guide will help you understand everything about a loose heat shield. We will cover what a heat shield does, why it becomes loose, how to spot the warning signs, and exactly how to tighten it yourself. By the end of this article, you will feel confident tackling this repair on your own. Let us get into it.
Key Takeaways
- Spot the problem early: Recognizing rattling noises and visual signs of a loose heat shield prevents costly repairs later.
- Basic tools are all you need: Most tighten-a-loose-heat-shield jobs require only a wrench, drill, and new hardware.
- Safety comes first: Always let your car cool completely before working on any exhaust component.
- Know when to replace: Severely corroded or damaged shields are better replaced than repaired.
- Prevent future issues: Regular inspections and anti-rust treatments keep your heat shield secure for years.
- DIY saves money: Professional heat shield repair can cost $100-$300, but doing it yourself costs under $20 in parts.
- Drive safely: A properly secured heat shield protects your fuel lines, brake lines, and other vital undercarriage components.
📑 Table of Contents
- What Is a Heat Shield and Why Does It Become Loose?
- How to Spot a Loose Heat Shield
- Tools You Will Need to Tighten a Loose Heat Shield
- Step-by-Step Guide to Tightening a Loose Heat Shield
- When to Replace Instead of Tighten
- Preventing a Loose Heat Shield in the Future
- Common Mistakes People Make When Fixing a Loose Heat Shield
- Expert Insights: What Mechanics Wish You Knew
- Conclusion
What Is a Heat Shield and Why Does It Become Loose?
A heat shield is a thin sheet of metal attached to your car’s exhaust system. Its main job is to reflect heat away from sensitive parts of your vehicle. Think of it as a protective barrier. It keeps extreme temperatures away from your fuel lines, brake lines, and the plastic parts underneath your car. Without it, heat from the exhaust manifold and catalytic converter could cause serious damage.
Over time, heat shields can become loose. This happens for several reasons. Road vibrations are the biggest cause. Every time you drive over bumps, potholes, or rough terrain, those vibrations work their way under your car. The constant shaking loosens the bolts and clamps that hold the shield in place.
Common Causes of a Loose Heat Shield
Understanding why your heat shield has become loose helps you prevent it from happening again. Here are the most common causes:
- Vibration and road wear: Daily driving on rough roads gradually loosens fasteners over time.
- Rust and corrosion: Your car’s undercarriage takes a beating from salt, water, and debris. Rust eats away at the metal and threads on bolts.
- Worn-out rubber grommets: Many shields use rubber isolators to reduce vibration. These grommets dry out and crack with age.
- Accidents and impacts: Hitting a curb, speed bump too fast, or road debris can bend or shift the shield.
- Poor factory installation: Some vehicles leave the factory with slightly inadequate fastening hardware that loosens quickly.
No matter the cause, a loose exhaust heat shield needs attention. Ignoring it can lead to bigger problems down the road.
How to Spot a Loose Heat Shield
Catching a loose heat shield early saves you from expensive repairs. The symptoms are usually pretty obvious once you know what to listen for. Here are the top signs your heat shield has come undone.
Rattling and Clanking Noises
The most common sign is a metallic rattling sound. You will usually hear it when you start the engine or when you accelerate. The noise comes from the loose metal vibrating against the exhaust pipe or other components. Some people describe it as sounding like a tin can dragging on the road. If the sound gets worse when you hit bumps, that is a strong clue your shield is loose.
Visual Inspection Clues
You can often spot a problem just by looking under your car. Get a flashlight and check the area around your exhaust system. Look for:
- A heat shield that hangs lower than it should
- Visible gaps between the shield and the exhaust pipe
- Rusted or broken bolts and clamps
- A shield that wobbles when you push it gently
- Discolored or melted areas on nearby plastic parts
Burning Smells and Heat Damage
If your heat shield has shifted far enough, it may no longer protect surrounding components. You might notice a burning smell coming from under your car. This is a serious warning sign. Heat reaching your fuel lines or brake lines creates a real safety hazard. If you ever smell something burning while driving, pull over safely and check underneath your vehicle.
Tools You Will Need to Tighten a Loose Heat Shield
One of the best things about fixing a loose heat shield is that you do not need fancy equipment. Most people already have the tools at home. Here is what you will need:
Essential Tools
- Socket wrench set: You need various sizes to fit the bolts holding your shield.
- Rust penetrant spray: WD-40 or a similar product helps break loose rusted bolts.
- Drill with wire brush attachment: Useful for cleaning rust off bolt threads and contact surfaces.
- New bolts and nuts: Rust often damages existing hardware. Always keep spares on hand.
- Anti-seize compound: This prevents future rust from locking your new bolts in place.
- Jack and jack stands: You need to safely lift your car for undercarriage access.
- Gloves and safety glasses: Protect your hands from sharp metal edges and rust flakes.
Optional but Helpful Items
- Heat shield repair kit: These kits include clamps, brackets, and fasteners designed specifically for shields.
- Rubber isolation grommets: Replacing worn grommets reduces vibration and extends the life of your repair.
- Wire cutters and pliers: Helpful for removing old fasteners or trimming damaged clips.
Having everything ready before you start makes the job much smoother. There is nothing worse than getting halfway through and realizing you are missing a key tool.
Step-by-Step Guide to Tightening a Loose Heat Shield
Now for the part you have been waiting for. Here is exactly how to tighten a loose heat shield on your car. Follow these steps carefully and you will have the job done in under an hour.
Step 1: Park on a Flat Surface and Let the Car Cool
Safety first. Park your car on a level surface and turn off the engine. Wait at least 30 minutes for everything to cool down. The exhaust system gets extremely hot during driving. Touching it too soon can cause burns. Never attempt this repair on a warm vehicle.
Step 2: Lift the Vehicle Safely
Use a floor jack to lift the front of your car. Place jack stands under the frame for support. Never work under a car supported only by a jack. Once the car is secure on the stands, give it a gentle push to make sure it is stable.
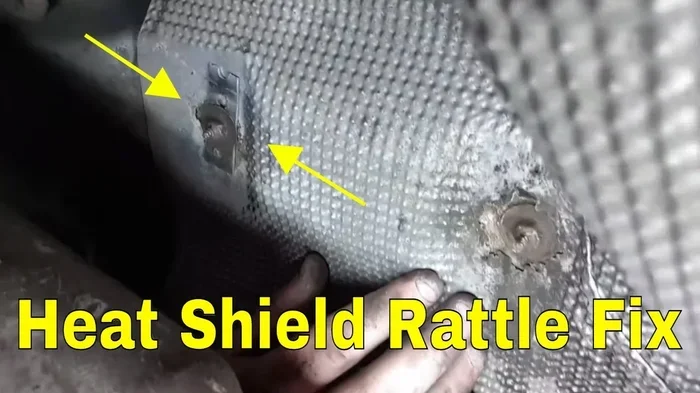
Step 3: Locate the Loose Heat Shield
Crawl under your car and find the loose heat shield. It is usually a thin sheet of metal attached to the exhaust manifold or catalytic converter area. Follow the rattling sound to identify the exact location. You may find more than one shield loose, so check all of them.
Step 4: Clean the Area Thoroughly
Before you do anything else, clean the contact surfaces. Use a wire brush to remove rust and debris from both the shield and the exhaust pipe. This ensures a solid connection when you reattach everything. Spray rust penetrant on any bolts that look corroded and wait a few minutes for it to work.
Step 5: Remove Damaged Hardware
Remove any bolts or clamps that are rusted, stripped, or damaged beyond use. Use your socket wrench to carefully unfasten them. If a bolt is stuck, apply more penetrant spray and give it time. Forcing a stuck bolt can break it off inside the bracket, which makes the problem much worse.
Step 6: Reattach the Heat Shield with New Hardware
Position the shield back in its proper place. Insert new bolts through the mounting holes. Apply a thin layer of anti-seize compound to each bolt thread before tightening. This simple step prevents rust from seizing the bolts in the future. Tighten each bolt snugly but do not over-torque. You want the shield firm and secure without warping the metal.
Step 7: Install New Rubber Grommets If Needed
If your shield uses rubber isolators and they look worn, replace them now. Slide the new grommets into place before tightening the final bolts. These rubber pieces absorb vibration and keep the shield from rattling again too soon. They are inexpensive and make a big difference.
Step 8: Lower the Car and Test the Repair
Carefully lower your car off the jack stands. Start the engine and let it idle for a few minutes. Listen closely for any rattling sounds. Take the car for a short test drive, paying attention to how it sounds under the hood and underneath. If the noise is gone, congratulations. You just fixed your loose heat shield successfully.
Quick Tips for a Better Repair
- Take a photo of the old setup before removing anything. This helps you remember the correct placement.
- Bring the old bolts to the auto parts store to match the exact size for replacements.
- Double-check that the shield is not touching the exhaust pipe directly. It should have a small gap.
- If you hear any noise after the repair, check that all bolts are tight and the shield is not bent.
When to Replace Instead of Tighten
Sometimes tightening a loose heat shield is not enough. If the metal is severely corroded, bent, or has holes burned through it, repair is not a safe option. A damaged shield cannot protect your car properly. In these cases, full replacement is the better choice.
You should also consider replacement if the shield has been loose for a long time. Prolonged vibration can weaken the metal and the mounting points. A shield that looks fine on the surface might be structurally compromised. When in doubt, get a professional inspection. Most mechanics will check your heat shields during an oil change or tire rotation if you ask them.
Heat Shield Replacement Cost
The cost to replace a heat shield varies depending on your vehicle and where you go. DIY replacement parts typically cost between $15 and $50 for the shield itself. Professional installation adds $100 to $250 in labor costs. For most sedans and compact cars, the total DIY cost stays under $50. That is a small price for protecting your car from heat damage.
Aftermarket vs. OEM Heat Shields
When shopping for a replacement, you have two main options. OEM parts are made by your car’s manufacturer and fit perfectly. Aftermarket shields are made by third-party companies and are often more affordable. Both can work well. Look for shields made from stainless steel for the best durability. They resist rust and last much longer than regular steel shields.
Preventing a Loose Heat Shield in the Future
The best repair is the one you do not have to repeat. Here are simple steps to keep your heat shield secure and your exhaust system in great shape.
Regular Undercarriage Inspections
Make it a habit to look under your car every few months. Check for rust, loose bolts, and any signs of wear on your heat shields. Catching a loose bolt early means you can tighten it before the shield has a chance to shift and rattle.
Apply Anti-Rust Treatment
Your car’s undercarriage takes a beating from road salt, water, and dirt. Spraying a rust inhibitor on the metal components helps protect them. Focus on areas around the exhaust system and heat shield mounting points. A can of undercarriage spray from any auto parts store does the trick.
Avoid Aggressive Driving Over Rough Terrain
While you cannot always avoid rough roads, you can be mindful of speed bumps, potholes, and debris. Slowing down over these obstacles reduces the impact on your undercarriage components, including your exhaust heat shield. This small change can extend the life of many car parts.
Replace Rubber Grommets Proactively
Rubber grommets dry out and crack over time. Even if they do not look worn, replacing them every few years as preventive maintenance is a smart move. New grommets keep vibration levels low and help your bolts stay tight longer.
Key Takeaways for Long-Term Shield Health
- Inspect your undercarriage every 3 to 6 months
- Apply rust inhibitor to exposed metal parts
- Replace worn rubber isolators before they fail
- Drive cautiously over rough terrain and speed bumps
- Address any rattling noises immediately
- Use quality stainless steel hardware for repairs
Common Mistakes People Make When Fixing a Loose Heat Shield
Even simple repairs can go wrong if you are not careful. Here are the most common mistakes people make when dealing with a loose heat shield and how to avoid them.
Mistake 1: Over-tightening the bolts. This is the number one error. Too much force can warp the thin metal of the shield or strip the threads. Tighten until snug and firm. Do not crank down with all your strength.
Mistake 2: Ignoring rust on the exhaust pipe. If the mounting surface is rusty, the new bolt will not hold properly. Always clean the surface before installing new hardware. A few minutes with a wire brush saves you from repeating the job.
Mistake 3: Using the wrong size fasteners. Not all bolts are the same. Heat shield bolts are often smaller and shorter than regular bolts. Using the wrong size can mean the shield does not sit flush or the bolt does not grip properly.
Mistake 4: Skipping the rubber grommets. Some people remove the old grommets and forget to replace them. Without these rubber isolators, vibration returns quickly and loosens the new bolts. Always install fresh grommets when available.
Mistake 5: Working on a hot car. This is dangerous and unnecessary. The exhaust system retains heat long after you turn off the engine. Wait at least 30 minutes, or better yet, do the repair the next morning before you drive the car.
Avoiding these mistakes makes your repair last longer and keeps you safe while working. A little patience goes a long way with any car maintenance task.
Expert Insights: What Mechanics Wish You Knew
We talked to several experienced mechanics about heat shield repairs. Here is what they had to say.
Most mechanics agree that a loose heat shield is one of the most common and least expensive repairs people can do themselves. “I see customers come in all the time paying $150 for something they could fix in 20 minutes with a wrench and $5 in parts,” says one veteran mechanic. “The hardest part is getting under the car and finding the right bolt.”
Another expert shared an important tip: “Do not ignore a loose heat shield just because it makes noise but still works. Over time, the constant vibration can fatigue the mounting points on the exhaust manifold. What starts as a simple tighten job can turn into a weld repair if you wait too long.”
Professional mechanics also emphasize the importance of quality parts. “Cheap aftermarket shields from unknown brands often use thin metal that warps and rusts quickly,” one mechanic warned. “Spend a few extra dollars on a reputable brand or OEM part. It is worth it for the durability.”
One final insight worth noting: “If your heat shield keeps coming loose even after you retighten it, something bigger might be going on. The exhaust system itself might have shifted, or there could be internal damage causing excessive vibration. Get it checked by a professional if the problem persists.”
Conclusion
A loose heat shield is one of those car problems that sounds scary but is actually quite manageable. With the right tools, a little patience, and the steps outlined in this guide, you can fix the issue yourself and save significant money. You now know how to identify the signs of a loose shield, what tools you need, and exactly how to complete the repair safely.
Remember that prevention plays a huge role in keeping your heat shield secure long-term. Regular inspections, anti-rust treatments, and proactive grommet replacement all contribute to a healthier exhaust system. And if the shield is too damaged to save, replacement is straightforward and affordable.
Do not let a rattling noise under your car turn into a costly repair. Take action today. Grab your tools, lift your car, and give your loose heat shield the attention it deserves. Your car and your wallet will thank you.
Frequently Asked Questions
Can I drive my car with a loose heat shield?
You can drive short distances with a loose heat shield, but it is not recommended for long trips. A loose shield can allow heat to reach fuel lines, brake lines, and other plastic components underneath your car. It can also damage the shield further and cause it to fall off completely. Tighten or repair it as soon as possible to avoid safety risks and more expensive repairs.
How much does it cost to fix a loose heat shield?
If you do it yourself, the cost is typically under $20 for replacement bolts, clamps, and grommets. Professional repair usually costs between $100 and $300 depending on your vehicle and local labor rates. The repair itself is quick, so labor costs are relatively low compared to many other car repairs.
What happens if a heat shield falls off completely?
If a heat shield falls off, your exhaust system loses its protective barrier. Extreme heat from the exhaust pipe and manifold can reach nearby components like fuel lines, brake lines, and the car’s underbody plastic panels. This creates a fire risk in extreme cases and can melt or damage vital systems. Replace the shield immediately if it has fallen off.
Can I weld a loose heat shield back in place?
Welding can be an option for severely corroded mounting points where bolts no longer hold. However, welding requires specialized equipment and skill. For most people, replacing the bolts, clamps, and grommets is a simpler and more effective solution. If you are not experienced with welding, it is best to leave this to a professional mechanic.
How do I stop my heat shield from rattling after repair?
After tightening or replacing your heat shield, make sure all rubber grommets are in good condition. Worn grommets are a common cause of continued rattling. Also check that the shield is not touching the exhaust pipe directly. A small gap should exist between the shield and the pipe. Anti-seize compound on bolt threads also helps prevent future loosening from vibration.
Are aftermarket heat shields as good as OEM parts?
Many aftermarket heat shields are high quality and perform just as well as OEM parts. The key is to choose reputable brands made from stainless steel or heavy-gauge metal. Avoid the cheapest options, as they often use thin material that warps and rusts quickly. Read reviews and check specifications before purchasing to ensure you get a durable replacement.