Where Do I Change Date and Time on My Windows Laptop
Finding where to change date and time on your Windows laptop is quick and easy once you know the right steps. Whether you use Windows 10 or Windows 11, you can adjust your clock settings through the Settings app or Control Panel in just a few clicks. This guide walks you through every method so you can set your date and time correctly and never miss a beat.
Have you ever opened your laptop and noticed the wrong date staring back at you? Maybe your clock jumped ahead or fell behind overnight. It happens to everyone. The good news is that fixing this is simpler than you think. You do not need to be a tech expert to get it right.
In this guide, I will show you exactly where do I change date and time on a Windows laptop. We will cover every method available. You will learn how to adjust your clock manually and set it to sync automatically. By the end, you will have full control over your date and time settings on your PC.
Your laptop’s clock affects more than you might realize. Wrong timestamps mess up your emails, file names, and even your scheduled tasks. A correct system clock keeps everything running smoothly. Let us dive into the steps and get this sorted out for you.
Key Takeaways
- Multiple Ways to Change It: You can adjust your date and time through Settings, Control Panel, or the taskbar clock.
- Automatic Sync Is Key: Turning on automatic time sync keeps your laptop clock accurate without manual effort.
- Time Zone Matters: Setting the correct time zone ensures your clock reflects the right local time.
- Format Customization: You can change how dates and times display to match your preferences.
- Troubleshooting Helps: Knowing common fixes saves time when your clock won’t update properly.
- Works on All Windows Versions: The steps apply to Windows 10, Windows 11, and older versions.
📑 Table of Contents
Why Getting the Date and Time Right Matters
Some people ignore a wrong clock. They think it does not matter much. But it really does. Here is why getting your date and time correct on your laptop is important.
First, many apps rely on accurate timestamps. Your email client stamps every message with the current time. Cloud services like OneDrive and Google Drive use timestamps to track file changes. If your clock is off, you might lose track of when things happened.
Second, security certificates depend on correct system time. Websites use SSL certificates to prove they are safe. If your laptop clock is way off, your browser might block trusted sites. This can cause frustrating errors when you try to visit legitimate pages.
Third, scheduled tasks and reminders need the right time. Your calendar app, alarm clocks, and automated backups all depend on an accurate Windows clock. A few minutes off can cause missed meetings or failed backups.
The Role of Time Zones
Your time zone setting tells Windows which region you live in. When you travel or move to a new place, you need to update this. Without the right time zone, your clock will show the wrong local time even if it is technically “correct” in another region.
Windows makes it easy to let your laptop detect your time zone automatically. You can also set it manually. Both options work well. The automatic method uses your IP address and Wi-Fi data to guess your location. The manual method lets you pick from a full list of time zones around the world.
Where Do I Change Date and Time Using Settings
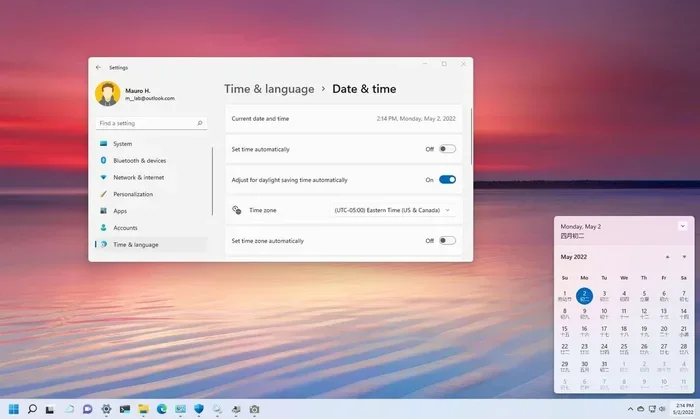
The fastest way to change your date and time is through the Windows Settings app. This method works on both Windows 10 and Windows 11. Here is how to do it step by step.
Step 1: Click the Start button or press the Windows key on your keyboard. The Start menu will open.
Step 2: Click the gear icon labeled Settings. This opens the main Settings window.
Step 3: Click on Time & Language. In Windows 11, this might show as Date & Time directly in the left sidebar.
Step 4: Look for the Date & Time section on the right side. You will see options for setting your time zone and toggling automatic sync.
Step 5: Toggle the Set time automatically switch to On. This lets Windows pull the correct date and time from an internet server.
Step 6: If you need to change the time zone manually, click the Time Zone dropdown and pick your region.
Step 7: Click the Change button next to Set the date and time manually if you want to enter the values yourself.
That is it. Your laptop clock should now reflect the correct date and time. If it does not update right away, try restarting your computer or syncing again.
Adjusting the Date and Time Format
Windows lets you choose how your date and time displays on screen. Some people prefer a 12-hour clock. Others like the 24-hour format. You can also change the order of day, month, and year in your date format.
To change the date and time format, go to Settings, then Time & Language, and click on Language & Region. Look for the Regional Format section. From there, you can pick a format that matches your country or personal preference. This is especially helpful if you share your laptop with someone from another region.
Using the Control Panel to Change Date and Time
The Control Panel is the older way to access date and time settings in Windows. Some people still prefer it because it gives you more detailed options. Here is how to find it.
Step 1: Press the Windows key and R at the same time. This opens the Run dialog box.
Step 2: Type control panel and press Enter. The Control Panel window will open.
Step 3: Click on Clock and Region. If you are viewing by Category, click on Date and Time instead.
Step 4: Click on Date and Time again. A new window will pop up with your current system clock settings.
Step 5: Click the Change date and time button. You can now pick a new date and time from the calendar and clock picker.
Step 6: Click OK to save your changes. Your Windows laptop will now use the new settings.
The Control Panel also lets you access the Date and Time Properties window. From there, you can switch to the Internet Time tab and sync with a time server. This is useful if the automatic sync is not working properly.
What Is an Internet Time Server?
An internet time server is a computer on the web that keeps extremely accurate time. Windows can connect to this server to sync your system clock. The default server is time.windows.com, but you can change it to another server if needed.
Using an internet time server ensures your date and time stays accurate even if your laptop loses its internet connection for a while. When you reconnect, it will sync again and correct any drift. This is much better than relying on your laptop’s internal clock alone.
Changing Date and Time from the Taskbar
The quickest way to check or adjust your date and time is right from the taskbar. The taskbar clock sits in the bottom-right corner of your screen. You can click on it to see more options.
In Windows 11, click the clock on the taskbar. A small panel will slide out showing your current date, time, and notifications. Click the gear icon or the Date and Time button to jump straight to the Settings page.
In Windows 10, click the clock and then click on the date and time itself. This opens the Settings panel directly. From there, you can toggle automatic sync or change your time zone quickly.
This method is great for fast checks. But if you need to make bigger changes, the Settings app or Control Panel gives you more control. Think of the taskbar as your quick-access shortcut.
Quick Tips for Taskbar Clock Management
- Show Seconds: Some Windows versions let you show seconds on the taskbar clock for extra precision.
- Hide the Seconds: If you find it distracting, you can turn off the seconds display.
- Use Keyboard Shortcuts: Press Windows key + A to open the Quick Settings panel. From there, you can click the date and time tile.
- Right-Click Options: Right-clicking the taskbar clock gives you fast access to Adjust date and time settings.
Fixing Common Date and Time Problems
Sometimes your date and time keeps resetting or won’t sync properly. This can be annoying, but it is usually easy to fix. Here are the most common problems and their solutions.
Clock Resets After Restarting
If your Windows laptop clock resets every time you restart, the CMOS battery might be dying. This small battery on your motherboard keeps the clock running when your laptop is off. When it weakens, the clock loses its memory. Replacing the CMOS battery is inexpensive and fixes this issue completely.
Automatic Time Sync Not Working
If the automatic time sync toggle is grayed out or not working, try these steps. First, make sure the Windows Time service is running. Press Windows key + R, type services.msc, and press Enter. Look for Windows Time in the list. Make sure its status is Running and the startup type is Automatic.
Second, check your internet connection. Syncing requires a working connection to reach the time server. Third, try changing the time server address in the Internet Time tab of the Control Panel.
Wrong Time Zone After Windows Update
Sometimes a Windows update resets your time zone setting. If your clock suddenly shows the wrong time, check your time zone in Settings. Go to Time & Language and make sure the right region is selected. Turn off automatic time zone detection if it keeps changing on you.
Date and Time Format Shows Incorrectly
If your date format looks wrong, go to Settings, then Time & Language, then Language & Region. Check your Regional Format setting. You can also click the Change date and time formats link to customize how your date and time appear on screen.
Daylight Saving Time Issues
Windows usually handles daylight saving time adjustments automatically. But sometimes it gets confused, especially after a major update. Make sure the Adjust for daylight saving time checkbox is checked in your date and time settings. If problems persist, check for Windows updates that might include a time zone database fix.
Expert Tips for Keeping Your Clock Accurate
Now that you know where do I change date and time on your Windows laptop, here are some expert tips to keep things running smoothly.
Tip 1: Always keep automatic sync turned on. This is the single best way to ensure your clock stays correct. Manual adjustments are fine for quick fixes, but automatic sync handles the heavy lifting.
Tip 2: Check your time zone when you travel. If you fly to another city or country, update your time zone right away. Some laptops do this automatically if location services are enabled. If not, you will need to change it manually.
Tip 3: Replace the CMOS battery every few years. This prevents the clock-reset problem we talked about earlier. A fresh battery keeps your system clock accurate even when the laptop is unplugged and off.
Tip 4: Use a reliable internet connection for syncing. If your internet connection is weak or unstable, the sync might fail. Try syncing when you are on a stable Wi-Fi network.
Tip 5: Keep Windows updated. Microsoft regularly releases updates that improve date and time handling. These updates often fix bugs and improve time zone accuracy.
Tip 6: Use the command line for advanced users. If you are comfortable with the terminal, you can use the w32tm command to force a time sync. Just open Command Prompt as administrator and type w32tm /resync. This forces Windows to sync with the time server immediately.
Key Takeaways
- Multiple Paths to the Same Goal: You can change your date and time through Settings, Control Panel, or the taskbar clock.
- Automatic Sync Saves Time: Turning on automatic time sync keeps your laptop clock accurate without any effort.
- Time Zone Settings Are Crucial: The right time zone ensures your clock shows the correct local time wherever you are.
- Format Customization Helps: You can change how dates and times display to match your personal or regional preferences.
- Common Problems Have Simple Fixes: Most date and time issues can be resolved by checking sync settings, time zone, or the CMOS battery.
- Expert Habits Keep Clocks Accurate: Regular syncing, timely updates, and fresh batteries prevent most clock problems.
Conclusion
Knowing where do I change date and time on your Windows laptop is a basic but essential skill. Your system clock touches almost everything you do on your computer. From sending emails to running scheduled backups, accurate time keeps your digital life organized.
We covered three main methods in this guide. You learned how to use the Settings app, the Control Panel, and the taskbar clock. Each method works well, and you can pick whichever feels most comfortable. The Settings app is the most modern and user-friendly option. The Control Panel gives you deeper access for advanced adjustments.
We also explored common problems and how to fix them. Whether your clock resets after a restart or the automatic sync stops working, there is a solution. Most fixes take just a few minutes and do not require any special tools or technical knowledge.
Remember to keep your time zone correct, especially when you travel. Turn on automatic date and time sync so Windows handles the updates for you. And if you ever notice your clock drifting, check the CMOS battery or force a sync through the command line.
Your laptop is a tool that works best when all its settings are correct. Taking a few minutes to set your date and time properly pays off in reliability and accuracy. Apply what you learned here today, and your Windows laptop clock will stay spot-on for years to come.
Frequently Asked Questions
Can I change the date and time on my Windows laptop without admin rights?
Typically, you need administrator privileges to change the date and time on a Windows laptop. Standard user accounts can view the clock but cannot modify the system time. If you are on a shared or work computer, you may need to contact your IT admin to make these changes.
Why does my Windows laptop clock keep losing time?
The most common reason is a dying CMOS battery. This small battery on the motherboard powers the clock when the laptop is off. Another reason could be that automatic time sync is turned off or your internet connection is unstable. Replacing the battery or enabling sync usually fixes the issue.
How do I change the date format on my Windows laptop?
Go to Settings, then Time & Language, then Language & Region. Under Regional Format, click the dropdown and choose your preferred format. You can also click Additional date, time, and regional settings to access more customization options for your date and time display.
What is the best time server for syncing my Windows laptop clock?
The default server time.windows.com works well for most users. However, you can use other servers like time.nist.gov or pool.ntp.org for redundancy. To change it, go to Control Panel, then Date and Time, then the Internet Time tab, and click Change Settings.
Does changing the date and time affect my files or programs?
Changing the date and time does not delete or alter your files. However, some software uses timestamps for licensing or activation. If you manually change the clock far into the future or past, certain apps might behave unexpectedly. It is best to keep your system clock as accurate as possible.
How often should I sync my Windows laptop clock?
If you have automatic time sync enabled, Windows syncs regularly in the background. You do not need to do anything manually. If you prefer manual syncing, once a week is usually enough. If you notice your clock drifting, you can force a sync anytime through the Settings app or the command line.