What Level Should Headlights Be Set At For Best Visibility
What Level Should Headlights Be Set At For Best Visibility is a question every driver should know the answer to. Setting your headlights at the correct level ensures you see the road clearly and avoids blinding other drivers. This guide covers everything from basic headlight alignment to advanced tips for maximum road illumination. Whether you drive halogen, LED, or projector headlights, proper adjustment makes a huge difference in safety.
Key Takeaways
- Correct headlight height matters: Setting headlights too high or too low reduces visibility and creates danger for oncoming drivers.
- Low beam is for everyday driving: Most of your night driving should use low beam settings for safe road illumination without blinding others.
- High beam has its place: Use high beam on dark, empty roads, but always switch back when you see oncoming traffic.
- Check alignment regularly: Headlights can shift over time due to wear, bumps, and cargo weight changes.
- Headlight type affects the ideal setting: Halogen, LED, and projector headlights each have unique adjustment needs.
- Clean lenses boost performance: Dirty or foggy headlight housings can cut visibility by up to 50 percent.
- Automatic leveling systems help: Many modern cars have headlight leveling features that adjust beam height based on load.
📑 Table of Contents
Understanding Headlight Levels and Why They Matter
Driving at night can be stressful. Roads are dark. Animals might dart out. And your headlight beam height determines whether you see obstacles in time or drive blind. This is why knowing what level headlights should be set at for best visibility is so important. It is not just about seeing better. It is also about being a safe driver for everyone on the road.
Many drivers never think about their headlight alignment until something goes wrong. Maybe they notice the light points upward at the trees instead of the road. Or maybe they get flashed by an angry driver. These are signs that your proper headlight aim is off. Fixing it is easier than most people think, and it can transform your night driving experience.
What Are Low Beam and High Beam Settings?
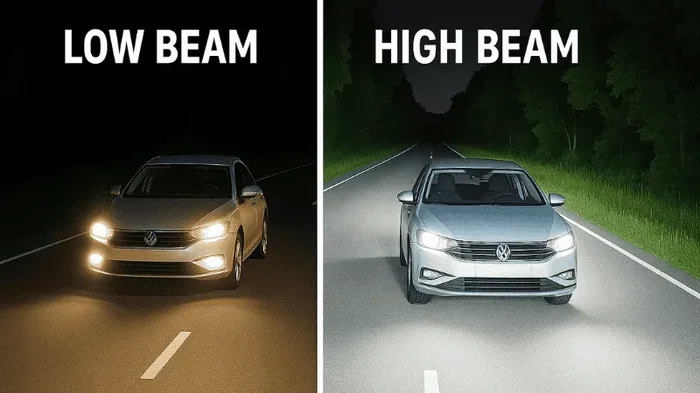
Your headlights have two main settings. The low beam (also called dip beam) points slightly downward. It lights up the road ahead without shining into the eyes of oncoming traffic. The high beam (also called far light setting) points straight ahead. It gives you maximum road illumination but can blind other drivers.
For most driving situations, low beam is the right choice. You should use high beam only on dark roads with no other cars around. Switching between them at the right time is a basic driving skill that keeps everyone safe.
Why Headlight Level Matters for Night Driving
When your headlights are set too low, you cannot see far ahead. The visibility on roads drops dramatically. You might miss a pothole, a pedestrian, or a stopped car until it is too late. When they are set too high, you blind other drivers. They might swerve or brake suddenly, causing an accident.
The goal is balance. You want enough light to see the road clearly. But you also want to keep the beam from hitting other drivers’ eyes. That balance depends on the correct headlight level for your specific vehicle.
How to Set Your Headlights at the Right Level
Setting your headlights correctly is not guesswork. There is a straightforward process you can follow at home. You do not need expensive tools. A flat wall, a tape measure, and about 30 minutes of your time will do the job.
Checking Your Headlight Alignment
Start by parking your car on a flat surface. Face it toward a wall or garage door about 25 feet away. Turn on the low beams. Look at where the light hits the wall. You should see a clear cutoff line. The center of the beam should be at or slightly below the height of the headlight housing.
If the light is too high, pointing at the upper part of the wall, your headlights need adjustment. If the light is too low or uneven, one side may need more work than the other. This simple check tells you a lot about your headlight adjustment needs.
Step-by-Step Headlight Adjustment Process
Here is how to adjust your headlights step by step:
- Park your car 25 feet from a flat wall on level ground.
- Turn on the low beams and mark the center point of each light on the wall.
- Open the hood and locate the headlight adjustment screws. These are usually on top and on the side of the headlight housing.
- Use a screwdriver to turn the vertical adjustment screw. Turn clockwise to raise the beam, counterclockwise to lower it.
- Aim for the center of the beam to sit at or just below the height of the headlight housing on the wall.
- Check the horizontal alignment too. The beam center should be slightly to the right (on US roads) to light the road without glaring at oncoming traffic.
- Test drive on a dark road and confirm the new headlight beam height feels right.
Take your time with this process. Rushing through it can leave your headlights set at the wrong level, which defeats the whole purpose.
Quick Tips for Perfect Headlight Aim
- Check your headlights with the car loaded as you normally drive (with passengers and cargo in the trunk).
- Make adjustments in the evening when it is dark, so you can see the beam pattern on the wall.
- Have a helper turn the headlights on and off while you observe the beam from behind the car.
- Repeat the check every few months, especially after hitting a large pothole or speed bump.
- Keep a flashlight handy to inspect the headlight housing for cracks or moisture buildup.
Common Mistakes People Make with Headlight Settings
Even careful drivers make mistakes with their headlight settings. These errors can reduce visibility and create safety risks. Knowing what to avoid helps you keep your lights working at their best.
Overlooking the Impact of Load Weight
One of the biggest mistakes is ignoring how much weight is in your car. When your trunk is full of groceries or you have passengers in the back, the rear of the car sinks. This tilts the headlights upward, blinding oncoming drivers even if the headlight leveling system was set correctly when the car was empty.
If you regularly carry heavy loads, consider adjusting your headlights more frequently. Some vehicles have automatic headlight leveling systems that compensate for load changes. If your car has this feature, make sure it is working properly.
Ignoring Regular Headlight Checks
Most people only think about their headlights when one burns out. But headlight alignment can shift over time. Vibration from driving, temperature changes, and age all affect how your headlights point. A quick check every few months can catch problems before they become dangerous.
Set a reminder on your phone. Make it part of your regular car care routine, right alongside checking tire pressure and oil levels. It only takes a few minutes and can save you from a dangerous night drive.
Using the Wrong Beam for the Situation
Another common mistake is leaving high beams on in town or in traffic. High beams are great on empty country roads, but they are dangerous in areas with other cars. The bright light reflects off rain, fog, and dust, actually reducing your visibility on roads instead of improving it.
In foggy conditions, use low beams or fog lights if your car has them. High beams in fog create a wall of glare that makes everything harder to see. Understanding when to use each beam setting is a key part of safe night driving.
Headlight Types and Their Ideal Settings
Not all headlights are the same. The type of headlight you have affects how it should be adjusted. Different technologies produce different beam patterns, and each has its own ideal headlight level for best visibility.
Halogen Headlights
Halogen headlights are the most common type. They use a tungsten filament inside a halogen gas-filled bulb. They produce a warm, yellowish light that works well for most driving conditions.
For halogen headlights, aim the beam so the cutoff line sits at or just below the center of the headlight housing. These bulbs tend to have a wide spread, which is great for seeing the edges of the road. But they also heat up, so always let the bulb cool before touching it during adjustment.
LED Headlights
LED headlights are becoming more popular. They produce bright, white light and use less energy than halogen bulbs. They also last much longer. However, their intense brightness means the proper headlight aim is even more critical.
With LED headlights, the beam cutoff should be sharp and well-defined. If the light is too high, it can be especially blinding to oncoming drivers because of the brightness. Many LED headlight assemblies come with built-in adjustment screws that make calibration easier than older halogen setups.
Projector Headlights
Projector headlights use a lens and reflector system to focus the light into a tight, controlled beam. They produce the cleanest cutoff line of any headlight type. This makes them excellent for driving at night because you get strong road illumination without much glare.
For projector headlights, the ideal headlight setting keeps the cutoff line at the center height of the housing or just slightly below. Because the lens focuses the light precisely, even small misalignments can create noticeable problems with visibility or glare.
Comparison Table: Headlight Types and Ideal Settings
| Headlight Type | Beam Pattern | Ideal Height Setting | Best For |
|---|---|---|---|
| Halogen | Wide, warm spread | At or just below housing center | Everyday driving, budget-friendly |
| LED | Bright, focused white | At housing center, sharp cutoff | Modern vehicles, high visibility |
| Projector | Tight, controlled beam | At or just below housing center | Clear cutoff, minimal glare |
| HID/Xenon | Intense, blue-white | At housing center, careful aim | High-performance vehicles |
No matter what type of headlights you have, the principle remains the same. The beam should light up the road ahead without blinding others. Getting the headlight beam height right is the foundation of safe night driving.
Expert Tips for Maximum Visibility
Setting the correct level is just the first step. There are many other things you can do to improve your visibility on the road at night. These tips go beyond just adjusting the screws on your headlight housing.
Clean and Maintain Your Headlights Regularly
Dirty headlights are a hidden visibility killer. Over time, headlight lenses become cloudy, yellowed, and scratched. This headlight restoration problem can reduce your light output by up to 50 percent. No amount of proper aiming will help if the lens is too foggy to let the light through.
Clean your headlights regularly with a dedicated headlight restoration kit. These kits remove the oxidized layer and restore clarity. You can also use a mild abrasive like toothpaste in a pinch, but a proper restoration kit gives much better and longer-lasting results. After cleaning, apply a UV sealant to protect the lens from future damage.
Replace Bulbs in Pairs
When one headlight bulb burns out, replace both sides at the same time. A new bulb on one side and an old dim bulb on the other creates uneven road illumination. The old bulb will be noticeably dimmer, which can be distracting and reduce your overall visibility.
Always choose bulbs that match your vehicle’s specifications. Using the wrong bulb type can damage the headlight housing or create an improper beam pattern. Check your owner’s manual for the recommended bulb type and wattage.
Check for Headlight Flickering
If your headlights flicker or dim while driving, do not ignore it. Headlight flickering can be a sign of a failing bulb, a loose connection, or a problem with the vehicle’s electrical system. Flickering lights reduce your visibility and can distract other drivers.
Address flickering headlights quickly. Often, the fix is as simple as cleaning the bulb contacts or replacing a worn-out bulb. But if the problem persists, have a mechanic check the wiring and voltage regulator. A healthy electrical system keeps your headlights performing at their best.
Consider Upgrading Your Headlight System
If your car has older headlights, an upgrade can make a dramatic difference. Modern LED headlight conversions and projector retrofit kits offer much better visibility than factory halogen setups. They also tend to last longer and use less power.
Before upgrading, check your local laws. Some jurisdictions have regulations about headlight color, brightness, and type. Make sure any upgrade you make is road legal. A headlight leveling system upgrade can also be worthwhile, especially if you frequently carry heavy loads.
Drive Smart at Night
Even perfectly adjusted headlights cannot compensate for poor driving habits. Reduce your speed at night. Keep a greater following distance. Stay alert for pedestrians, cyclists, and animals. Your headlight level for best visibility gives you the tools, but safe driving habits keep you out of trouble.
Also, keep your windshield clean inside and out. Streaks and grime on the inside of the glass scatter headlight light and create glare. A quick wipe with a glass cleaner before a night drive can noticeably improve your view of the road ahead.
Final Thoughts on Headlight Level for Best Visibility
Setting your headlights at the right level is one of the simplest and most impactful things you can do for safer driving. It takes just a little time and effort, but the results are enormous. You will see the road better, react faster to hazards, and avoid blinding other drivers.
What Level Should Headlights Be Set At For Best Visibility comes down to a few key principles. Keep the beam at or just below the headlight housing height. Use low beam for most driving situations. Switch to high beam only when the road is clear and dark. Check your alignment regularly, especially after loading your car or hitting bumps.
Take care of your headlights. Clean the lenses. Replace bulbs in pairs. Address flickering or dimming right away. These small habits add up to a big difference in your night driving experience. When your headlights are working properly, you drive with confidence. You see what is ahead. And you share the road safely with everyone else.
Now that you know how to set your headlights correctly, make it a priority. Check your headlight alignment this week. You will be glad you did. Safe driving starts with seeing clearly, and clear visibility starts with the right headlight level.
Frequently Asked Questions
What is the correct headlight height for best visibility?
The correct headlight height is when the beam center sits at or just below the center of the headlight housing. This ensures the light covers the road ahead without shining into the eyes of oncoming drivers. Always check with your car parked on a flat surface about 25 feet from a wall.
How often should I check my headlight alignment?
You should check your headlight alignment at least twice a year, or every 6,000 miles. Additional checks are needed after hitting a large pothole, carrying heavy loads, or noticing that your visibility on roads has decreased. Regular checks keep your headlight beam height accurate and safe.
Can I adjust my headlights myself, or do I need a mechanic?
Most drivers can adjust their headlights themselves with basic tools. You need a flat wall, a tape measure, and a screwdriver. The process takes about 30 minutes. However, if your vehicle has complex headlight systems or automatic leveling, a mechanic may be the better choice for precise calibration.
Why do my headlights point upward even after adjustment?
Headlights pointing upward are often caused by a worn or broken headlight leveling system. Heavy loads in the trunk can also push the rear of the car down, tilting the headlights up. Check your suspension and load weight first. If the problem persists, inspect the adjustment mechanism or seek professional help.
What is the difference between low beam and high beam headlight settings?
Low beam (dip beam) points slightly downward and provides close-range road illumination without blinding other drivers. High beam (far light setting) points straight ahead for maximum road illumination on dark, empty roads. Use low beam for most driving and high beam only when no other vehicles are nearby.
Do automatic headlight leveling systems need maintenance?
Yes, automatic headlight leveling systems need occasional maintenance. These systems use sensors to adjust the headlight level based on your vehicle’s load. If the system malfunctions, the headlights may not adjust correctly. Have the sensors and motors checked during regular car service to ensure they work properly.
=== CONCLUSION ===
Getting your headlights set at the right level is essential for safe night driving. It improves your visibility on roads, protects oncoming drivers, and gives you confidence when the sun goes down. The process is simple, the tools are basic, and the payoff is enormous.
What Level Should Headlights Be Set At For Best Visibility is not a complicated question. The answer is at or just below the headlight housing center, with a sharp cutoff line that lights the road without glaring at others. Whether you drive halogen, LED, or projector headlights, this principle holds true.
Take action today. Check your headlight alignment, clean your lenses, and make a habit of regular inspections. Your headlights are your first line of defense on dark roads. Treat them well, and they will keep you safe mile after mile. Drive smart, drive visible, and enjoy the road ahead.